

Video Guide #
Scoring A Simple Assessment in Agolix
(Video link opens in a new browser tab)
Scoring Tab #
NOTE: You won’t see a “Scoring” tab if you’re working on a Multi-type assessment. If you’ve selected a Multi-type assessment, you can add score interpretations within each type on the “Types” tab.
On the “Scoring” tab, you can define the custom responses your respondents receive depending on their scores.
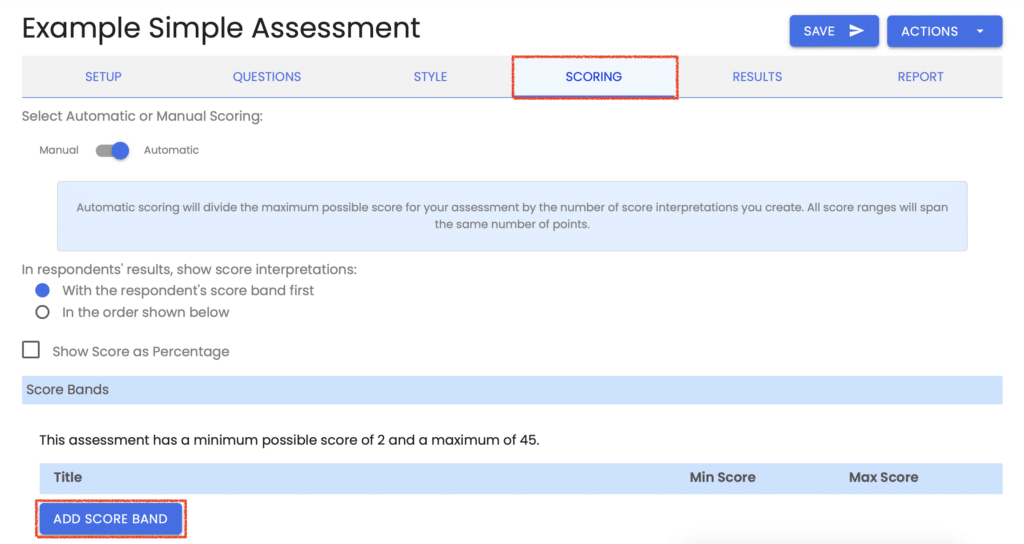
Click “Add Score Band.” Enter a title for your score band. For example, you might use “High” for the score band representing the highest score group for your assessment.
Enter text to show respondents who fall into the “High” category and click Save.
With “Automatic Scoring,” Agolix sets the score range for this score band to the entire possible range of scores (1-10) for this assessment. Now let’s create another band and see how this changes.
Click “Add Score Band” again, and create a new band for “Medium.” Save the band — now, respondents who score 1-5 will receive feedback for “Medium,” and respondents who score 6-10 will receive feedback for “High.”
Create one more score band, name it “Low” and notice that the score ranges are recalculated again. You don’t have to create your bands in the correct order. If you click and drag one of the score bands and drop it into another location, it will receive new score values based on its location in the list.
To customize your scoring bands, click the Automatic / Manual switch to “Manual,” and you’ll be able to set your score ranges for each interpretation.
For more details, please check out Scoring Your Simple Assessment.
Please review the rest of the Reference Guide to learn more about our software.
Thank you for choosing Agolix!
Continue to Quick Start: Assessment Results ->