An editor window displays text and related content that can be modified.
Start by entering the Agolix editor.
When building your assessment, you will find throughout the software tool the following editor window:

Definition of each icon: #
Paste #

Used for Formatting your copied text. This tool will attempt to preserve formatting when pasting from Word or other external sources.
Paste as Plain Text #

Sometimes pasting content from other programs will cause unwanted behavior. Use this tool to remove formatting and paste just the text.
Link #
Used to add a Link for your text. First, select the text that you want to become a link, then click this icon and enter the URL of your choosing. Click “OK” to save this link.
Video #
Used to add a Video to your content. Find out more on How to Add Videos to your Assessment.
Table #
Used to add a Table. The pop-up guides you on the specifics of Rows, Columns, Width, Height and more.
Page Break #
This icon allows a Page Break to be inserted so as to allow your content to display on one page or another. (Most useful when building your PDF Report).
Special Character #
Used when a Special Character is needed in your content. For example: an omega, delta, alpha, euro, arrow and many more.
Images #
Click this icon to upload Images, logos, files and more.
Maximize #
Click this icon to Maximize and enlarge your screen view.
Source #
Click on the Source button to view and edit the HTML code.
Simple Button #

This icon is the Simple Button, use it to add and configure a labeled button where you can choose the text, URL link, color and other settings. Some common Button Labels are “Contact Us“, “Let’s Connect“, “Schedule a Consultation“, “Download Your Personalized Report” or any other Call to Action you like.
Other Icons #
These 3 icons are B, used to make your text Bold. The I is used to Italicize your text. The U is used to underline your text.

This is the Strikethrough icon, used to create a line through your text. Ex: text.

This icon is used to Remove Format.
Click this icon to change the color of your text. You can use the pop colors provided or choose a custom color.

Click this symbol to add a Background Color for your text
Now we move on to the second row of icons: #
Add a List #

These icons are used to add a Numbered List or a Bulleted List.
Increase Indent #

This icon is used to Increase Indent.
Block Quote #

This icon is used to create Block Quotes around a sentence longer than 40 words or 4 lines.
Align text on a Page #
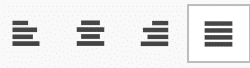
This set of icons are used to Align the text on the page. Click the first icon to align the text on the left side of the page, next icon will center the text, 3rd icon will align the text on the right side of the page and the last icon will justify the text. (When you justify text, space is added between words so that both edges of each line are aligned with both margins. The last line in the paragraph is aligned left).
Format #
Format or Normal is used to format the Paragraph Heading size. Click the drop-down arrow and choose from Normal, Heading 3, Heading 2, Heading 1 or Formatted.
Font #

Click Font to choose the font style for your text. Click the drop-down menu to see the “Nine Native fonts available. Read about using more Fonts in our User Guide.
Size #

Click Size and the drop-down menu to choose the size of your text.
Merge Codes #

Click Merge Code (only available under the Results tab) and the drop-down menu shows First Name, Last Name, Date and Email. Choose any from this list to pull data and insert it into your Results, OnScreen, Email and PDF Results. Read more about Merge Codes in our User Guide.
Please review the rest of the Reference Guide to learn more about our software.
Thank you for choosing Agolix!